

Table of Contents
- Understanding Trigger Pull Weight and Why Consistency Matters
- The Mechanics Behind a Consistent Trigger Pull
- How to Measure Trigger Pull Weight Accurately
- Proper Finger Placement and Grip Pressure
- Common Trigger Pull Mistakes That Kill Accuracy
- Best Trigger Pull Weight for Self Defense
- Dry-Fire Practice for Muscle Memory and Consistency
- Psychological and Physiological Factors in Trigger Control
Last Updated: August 18, 2026
Understanding Trigger Pull Weight and Why Consistency Matters
Consistent trigger pull weight is the foundation of accurate shooting. When your trigger breaks at a predictable force, your shots group tighter and accuracy improves dramatically. Inconsistency introduces uncontrollable variables, heavier pulls one shot, lighter the next, that compound into missed targets and failed competition runs.
A shooter with a consistent 3.5-pound pull outperforms one who varies between 2.5 and 4.5 pounds. Inconsistency forces you to anticipate and flinch, which kills accuracy faster than almost anything else. A 4-pound trigger that breaks at exactly 4 pounds every time will outperform a 3-pound trigger varying between 2.5 and 3.5 pounds because your muscle memory trains to the weight you expect. When that weight changes, your brain compensates with tension and anticipation.
At Polymer Pew, we understand that consistent trigger pull weight is essential for anyone serious about precision shooting. Whether you’re building a competition clone or upgrading a defensive platform, the trigger is where technique meets mechanics. Get the trigger right, and everything else becomes easier.
The Mechanics Behind a Consistent Trigger Pull
A trigger is a mechanical system with distinct stages, each affecting the next. Slack, take-up, wall, and break are the four phases every trigger goes through.
Stages of the trigger pull: slack, take-up, wall, and break
Slack is the dead zone at the beginning where you move the trigger but nothing happens yet. No sear engagement, no tension building. Quality triggers minimize slack because it creates uncertainty about when the next phase begins.
Take-up is where the sear engages, pressure builds, and you move closer to the break point. This is where most trigger pull weight lives. A crisp take-up means pressure increases steadily and predictably; a mushy take-up introduces inconsistency.
The wall is maximum pressure before the break. Some triggers have a pronounced wall you can feel distinctly; others have a softer wall. The wall is your reference point, telling you how close you are to breaking. A clear wall builds confidence and consistency.
The break is when the sear disengages and the firing pin releases. This is where consistency matters most. A crisp break at a predictable force separates quality triggers from budget ones. Creep (trigger continuing forward after break) and over-travel (movement after sear release) destroy consistency by introducing variables after the shot fires.
How sear engagement affects pull consistency
The sear holds the firing pin back until you press the trigger. Proper sear engagement keeps trigger pull weight consistent; poor engagement produces creep, over-travel, and unpredictable break points.
Budget triggers often cut corners on sear machining, resulting in gritty, unpredictable, inconsistent pulls. Quality sears are precision-machined so engagement surfaces are smooth and break points are repeatable. This is where aftermarket trigger engineering lives, which is why precision triggers cost more. A poorly engineered sear will never deliver consistent trigger pull weight regardless of practice.
How to Measure Trigger Pull Weight Accurately
You can’t improve what you don’t measure. A trigger pull gauge is your baseline tool, a simple device measuring the force required to break your trigger. Digital gauges are more precise; mechanical gauges are reliable and battery-free. Either provides the data you need.
When measuring, consistency in technique matters: same hand position, angle, and pressure pace. Measure at least three times and average results. Wildly varying measurements signal either inconsistent technique or a problematic trigger.
Set up a simple log: date, pull weight, notes. Measure after installation, then monthly. If pull weight creeps up or down, you’ve caught a developing problem early, maybe lubrication is needed, components are wearing, or sear engagement is degrading.
Proper Finger Placement and Grip Pressure
Your trigger control technique determines whether your trigger’s consistency translates into consistent shots. A quality trigger with poor technique still produces inconsistent results.
Why the finger pad matters for control
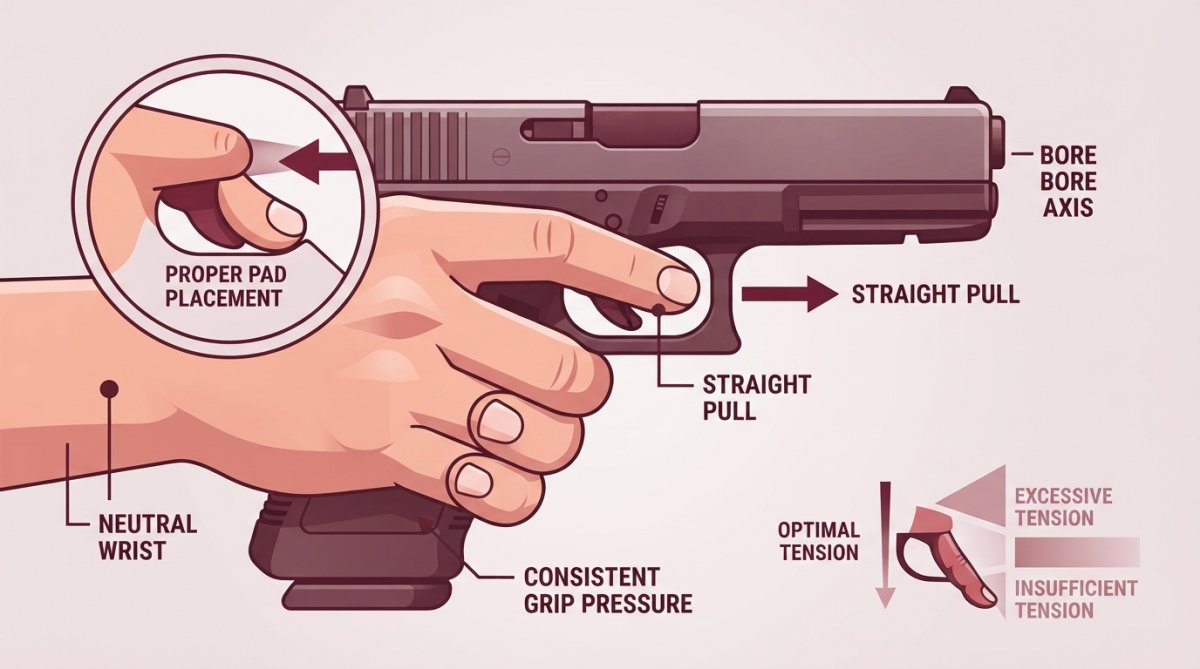
The finger pad, the flat surface between your trigger finger’s tip and first joint, is where trigger contact should be, not on the fingertip. The finger pad is wider, more stable, and gives consistent contact shot after shot. When you use your fingertip, small movements get magnified and pressure varies with each shot.
Proper placement means your trigger finger rests on the pad with the trigger breaking perpendicular to your finger, straight back. This alignment applies force directly to the sear without introducing torque that disturbs your sight picture.
Managing grip pressure without inducing torque
Grip pressure is the tension you apply with your entire hand. Too little and the firearm moves during recoil; too much induces torque that twists the firearm and throws shots off target.
The goal is a firm, stable grip without tension. Most shooters grip too hard, thinking more pressure equals more control. Actually, excessive grip pressure creates tension traveling up your arm and affecting your trigger press. You end up muscling the trigger instead of pressing smoothly.
Your grip should be firm enough that the firearm doesn’t move, but relaxed enough that you feel your trigger press distinctly. Gripping harder when nervous or trying for tighter groups is exactly backward. Relax your grip, and your trigger control improves.
Common Trigger Pull Mistakes That Kill Accuracy
Anticipation and flinching during the break
Anticipation is expecting recoil before it happens. Flinching is your body reacting by tensing or moving. Both happen subconsciously and cost accuracy.
A shooter who anticipates recoil unconsciously presses the trigger harder or faster as the break approaches, trying to "get ahead" of recoil. This inconsistency in trigger press translates to inconsistent shot placement. Flinching is the physical manifestation, your hand flinches downward or sideways just before the break, disturbing sight alignment.
The fix is mental: understand that recoil happens after the shot leaves the barrel, not before. Pressing harder or faster won’t reduce recoil; it only introduces inconsistency.
Inconsistent reset management between shots
The reset is when the trigger returns to ready position after the break. A common mistake is not allowing the trigger to fully reset before pressing again. This means your second shot starts from a different position than your first, making take-up, wall feel, and break point inconsistent.
After each shot, let the trigger reset completely. You’ll hear and feel a distinct click when the sear re-engages. Only after that click should you press for the next shot.
Creep and over-travel compensation errors
Creep is the trigger continuing forward after the sear breaks; over-travel is how far it moves after breaking. Both are mechanical properties, but shooters often compensate by changing press technique, introducing inconsistency.
The real fix is upgrading the trigger. A quality trigger has minimal creep and over-travel. You can’t reliably compensate for mechanical problems with technique; you only mask them temporarily, introducing the inconsistency you’re trying to eliminate.
Best Trigger Pull Weight for Self Defense
For self-defense shooting, the ideal trigger pull weight differs from competition shooting. You’re prioritizing reliability and speed over precision in high-stress scenarios.
Most defensive shooters run triggers between 3.5 and 5 pounds, heavy enough to prevent accidental discharge but light enough for fast, deliberate shots under stress. A 2-pound competition trigger is dangerous defensively; the margin for error is too small when adrenaline runs and decisions happen in milliseconds.
The consistency principle still applies. A 4-pound trigger breaking at exactly 4 pounds every time beats a 3-pound trigger varying between 2 and 4 pounds. Your muscle memory trains to the weight you practice with. Inconsistent practice builds unreliable defensive muscle memory.
Polymer Pew’s flat triggers are engineered for consistent pull weight across defensive shooting scenarios, prioritizing reliability and repeatability when stakes are highest.
Dry-Fire Practice for Muscle Memory and Consistency
Dry-fire practice, pressing the trigger without ammunition, builds muscle memory most efficiently. You can practice hundreds of reps without the cost and logistics of live fire.
Deliberate practice routines to build responsiveness
Deliberate practice means focused, repetitive work on specific trigger control elements. Set up a routine: 20 trigger presses focusing on smooth, controlled press without disturbing your sight picture. Pause between each press and reset your grip. Focus on one element per set, finger pad placement, feeling the wall, breaking cleanly. After 20 reps, move to the next element.
Track your performance. After a week of deliberate practice, your trigger press should feel smoother and more predictable. After a month, improvement is significant. This is muscle memory building, your nervous system learns the exact pressure and timing for consistent presses.
The key is consistency in practice. Same time, same place, same routine. Your nervous system learns patterns. Inconsistent practice trains inconsistency; deliberate practice builds reliable muscle memory.
Using reset feedback to refine your technique
The reset click is your feedback mechanism. After each dry-fire press, you should hear and feel the trigger reset, confirming the press was complete and the trigger is ready for the next shot.
Pay attention to reset quality. Does it feel smooth or gritty? Does it happen at the same point every time? The reset tells you about your trigger’s mechanical condition. Inconsistent resets suggest wear or lubrication issues.
Use the reset as a timing reference. Press, feel the reset, pause, press again. This rhythm trains your nervous system to reset completely between shots. In live fire, this same rhythm translates to consistent shot placement because you’re starting each shot from the same mechanical position.
Psychological and Physiological Factors in Trigger Control
Trigger control isn’t purely mechanical. Your mind and body affect how you press the trigger, measurably affecting shot placement.
How tension and anticipation affect pull weight perception
Tension is muscular tightness traveling from your hand up your arm into your shoulder. When tense, your entire arm tightens, affecting how you press the trigger. The trigger pull weight might be identical, but your perception changes because your hand is tighter.
This is why breathing matters. A deep breath before the shot relaxes your nervous system and reduces tension. Your trigger press becomes smoother and more consistent. Holding your breath or breathing shallow keeps you tense, making even a light trigger feel heavier and more inconsistent.
Anticipation usually means expecting recoil. Your body tenses in preparation, affecting your trigger press. The trigger pull weight feels heavier because your hand is tighter. You press harder than necessary, introducing inconsistency.
The fix is mental discipline: focus on the press itself, not the recoil that follows. The recoil will happen regardless of how you press. Your job is to press smoothly and consistently.
Recoil management and follow-through timing
Follow-through is maintaining your sight picture and body position after the shot breaks. Most shooters think follow-through happens after the shot, but it starts before, during the trigger press.
When you anticipate recoil, you unconsciously start moving backward before the shot fires, disturbing your sight picture and throwing your shot off. Quality recoil management means staying relaxed and in position during the trigger press, then absorbing recoil after the shot. Your grip stays firm but not tense. Your body stays aligned.
Consistent trigger pull weight combined with good recoil management and follow-through produces consistent accuracy. Miss any element, and even a perfect trigger won’t save your shot placement.
Trigger control is the difference between fighting your equipment and fighting your own limitations. When you nail consistent trigger pull weight through proper technique and deliberate practice, you remove a major variable. Your accuracy improves because you’re no longer compensating for an inconsistent press. Your competition scores improve because you’re repeating the same successful technique shot after shot.
At Polymer Pew, we build triggers engineered for consistent pull weight and reliable performance. Our flat triggers feature precision sear engagement and minimal creep, making your trigger press predictable and repeatable. Get started with Polymer Pew and eliminate trigger inconsistency from your platform.
| Trigger Control Element | Practice Focus | Expected Improvement Timeline |
|---|---|---|
| Finger pad placement | Consistent contact point | 1-2 weeks of deliberate practice |
| Grip pressure management | Firm but relaxed grip | 2-3 weeks of focused work |
| Reset awareness | Complete reset between shots | 1 week with deliberate practice |
| Anticipation control | Breathing and mental focus | Ongoing, improves with experience |
| Sear engagement feel | Identifying wall and break | 2-4 weeks of dry-fire practice |
Consistent trigger pull weight requires three elements: a quality trigger with proper sear engagement, correct finger placement and grip technique, and deliberate practice building muscle memory. According to National Shooting Sports Foundation guidance on firearm fundamentals, trigger control is one of the four pillars of accurate shooting, alongside sight alignment, sight picture, and breathing. Research on motor skill development shows that deliberate practice studies on skill acquisition produces faster improvement than random practice, applying directly to trigger control training. For shooters serious about precision, investing in understanding and practicing consistent trigger pull weight pays dividends in every shot. Start with a quality trigger, focus on proper technique, and commit to deliberate dry-fire practice. Results will be visible in your groupings within weeks. For defensive shooters, consistent trigger pull weight ensures reliability when it matters most. FBI Law Enforcement Training Center standards for defensive shooting emphasize trigger control consistency as essential for accurate, reliable performance under stress.
Frequently Asked Questions
What is a good pull weight for a trigger?
A good trigger pull weight depends on your use case. For precision shooting and competition, 2.5 to 3.5 pounds is typical. For self-defense, most shooters prefer 4 to 6 pounds to reduce accidental discharge risk. The key is consistency, the weight should remain stable across every shot, not vary by half a pound or more. Quality triggers maintain this consistency, which directly impacts your accuracy and reliability.
How do I know if my trigger has an inconsistent pull weight?
You'll notice inconsistency through unpredictable shot placement despite steady aim, or by using a trigger pull scale (a simple mechanical tool that measures break weight). If your first shot breaks at 3.2 pounds and your fifth shot breaks at 3.8 pounds, you have a consistency problem. This often results from creep, over-travel, or poor reset management. Dry-fire practice with feedback from the reset point will help you detect these variations before they affect live fire.
What causes inconsistent trigger pull weight?
Common causes include poor grip pressure (inducing torque on the trigger), inconsistent finger placement on the trigger pad, failure to manage the reset properly between shots, and mechanical wear on the sear engagement. Anticipation and flinching also degrade consistency because they introduce tension that changes how you apply force. Psychological factors like fatigue and concentration loss compound the problem. Addressing grip control and deliberate practice will resolve most consistency issues.
Can I improve trigger consistency through practice alone?
Yes, but only if your trigger mechanism itself is sound. Deliberate dry-fire practice builds muscle memory for consistent finger placement, reset management, and break timing. You'll develop better feel for the slack, take-up, wall, and break stages. However, if your trigger has mechanical defects (worn sear, excessive creep, or over-travel), practice alone won't fix it. Start with a quality trigger that holds consistent pull weight, then use dry-fire and live-fire practice to maximize your control.
This article was written using GrandRanker

