

Table of Contents
- Quick Comparison: Top Trigger Guard Alternatives
- Aluminum vs. Polymer Trigger Guard Durability
- Best AR-15 Trigger Guard for Winter Gloves
- How to Install an AR-15 Trigger Guard
- Compatibility and Fitment: What to Check Before Buying
- DIY Modification vs. Aftermarket Alternatives
- Conclusion
- Frequently Asked Questions
Last Updated: September 13, 2026
Quick Comparison: Top Trigger Guard Alternatives
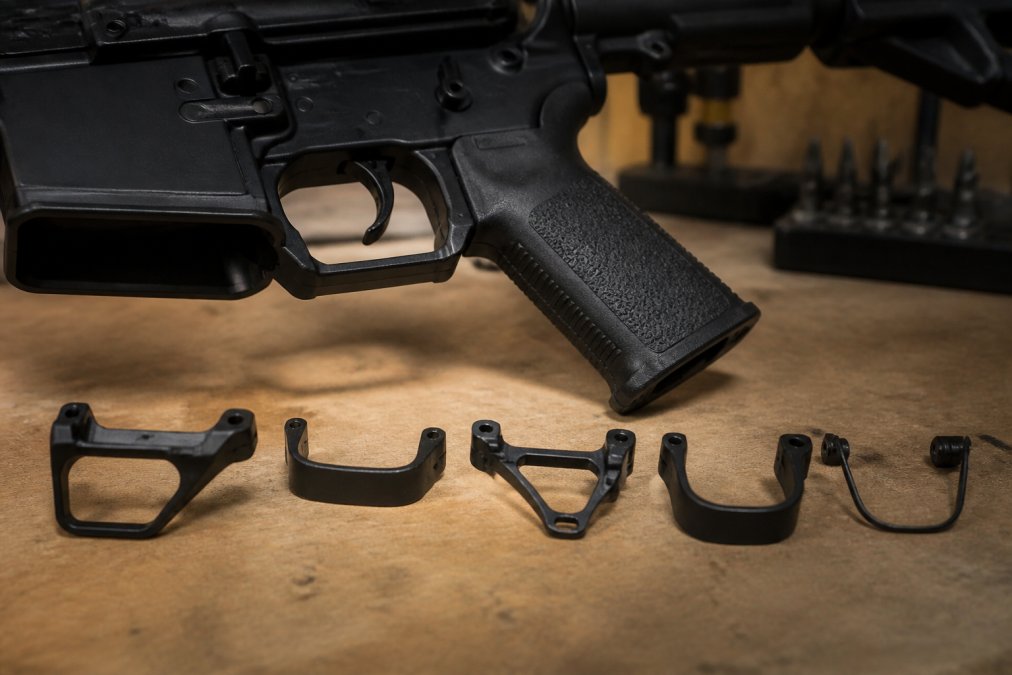
The best alternatives to standard AR-15 trigger guards solve a specific problem: the mil-spec guard was never designed for gloved hands, oversized winter gear, or modern ergonomic expectations. At Polymer Pew, we’ve tested enough lowers and parts kits to know that the “upgrade” you pick matters less than whether it actually fits your receiver and your use case. Below, we’ll show you exactly which alternatives are worth your money, which are hype, and how to install them without wrecking your lower.
Trigger guard alternatives range from sub-$10 polymer drop-ins to precision-machined billet aluminum pieces, and the right choice depends on three factors: your glove size, your receiver’s tolerances, and how hard you run the gun. This guide from Polymer Pew breaks down durability, fitment, winter performance, and installation so you can buy once and stop guessing.
| Option | Material | Starting Price | Best For |
|---|---|---|---|
| Magpul Enhanced | Polymer | $9.95 | Budget gloved shooting |
| Forward Controls TGF | 7075 Aluminum | $25.00 | Tight-tolerance fitment |
| Strike Industries Fang | Aluminum | $15.95 | Fast reloads |
| Strike Industries PolyFlex | Polymer | $8.95 | Quick snap-in install |
| Strike Industries Cobra | Aluminum | $12.95 | Ergonomic finger clearance |
| Geissele | 7075-T6 Aluminum | $25.00 | Premium matching builds |
| B5 Systems | Aluminum | $12.00 | Simple mil-spec replacement |
| Aero Precision | Aluminum | $9.99 | General-purpose builds |
| Polymer Pew Kits | Aluminum/Steel | See site | Clone compatibility |
SAAMI chamber and component specifications
Aluminum vs. Polymer Trigger Guard Durability
Aluminum wins on durability, polymer wins on weight and cost. That’s the honest summary most forum threads dance around. A CNC-machined, hard coat anodized aluminum guard resists impact, holds its shape through heat cycles, and won’t flex under a gloved finger. Polymer guards absorb shock well and cost a fraction as much, but they can develop stress marks at the mounting ears over time.
The trade-off shows up in two places. First, receiver ears: aluminum guards with tight tolerances distribute load evenly, while flexible polymer can leave small gaps. Second, finish wear: anodized aluminum hides scratches better than bare polymer.
When checking an aluminum guard, look for hard coat anodizing rather than a painted finish. Anodizing is a surface conversion that won’t chip off the way paint does, which matters if you’re running the gun hard in a dusty or sandy environment.
Best AR-15 Trigger Guard for Winter Gloves
The best AR-15 trigger guard for winter gloves is one whose opening geometry matches the glove you actually shoot in, not the glove you own. Standard mil-spec guards are sized around a bare finger, and the failure mode in cold weather is not that a glove won’t fit at all, it’s that a thick glove fits just well enough to drag on the guard, slow your trigger press, and pull your grip out of alignment. The fix is a guard with a widened, curved profile that opens trigger access without removing material from the receiver.
Glove thickness changes the answer more than brand does. Work through these three tiers before you buy:
- Heavy insulated winter gloves (liners plus shell). These add the most bulk at the fingertip and knuckle. You need a guard with a pronounced V or deep curve at the front, plus a generous radius where the guard meets the receiver ears, so the glove slides in instead of catching. A flat-sided guard, even an oversized one, will still pinch.
- Insulated tactical gloves (thinsulate-style, single layer). This is the middle case most shooters actually live in. A moderately oversized guard with chamfered edges and a slightly lowered bottom profile usually clears the trigger face without forcing you to shift your firing hand.
- Thin shooting or liner gloves. Almost any enhanced guard works here. If this is your only cold-weather glove, spend your money on trigger reach and ergonomics instead of maximum opening size.
Features that matter, in order of how much they change the outcome:
- V-shaped or deeply curved front profile that increases clearance at the point where the glove enters the guard
- Rounded, chamfered edges on every surface the glove contacts, so the draw to the trigger is smooth rather than snagging
- Trigger reach that stays consistent so you aren’t rotating your whole hand to make contact
- Rigid material so the guard doesn’t flex when a thick glove presses against it
Material matters more in the cold than most guides admit. Polymer guards stay flexible at low temperatures, which sounds like an advantage until you realize that flex lets a heavy glove push the guard out of position and change your trigger reach mid-string. A machined aluminum guard holds its geometry, which is why most shooters running heavy winter gloves end up on aluminum despite the weight penalty.
Test fitment with the exact glove you shoot in, at the temperature you shoot in. A glove that clears the guard in a warm room can stiffen and lose clearance once it’s cold, and a glove that feels tight on the bench will feel tighter with a loaded magazine and a firing grip.
How to Install an AR-15 Trigger Guard
Installing an AR-15 trigger guard takes about 10 minutes with basic punches and a hammer, and it’s one of the few jobs you can do without a full armorer’s bench. The two common methods are roll pin installation and set screw installation, and which one you use depends on your lower receiver.
What You’ll Need:
- Roll pin punch or set screw driver
- Small hammer
- Bench block or padded vise
- Blue thread locker (for set screws)
Step 1: Secure the lower receiver. Clamp it in a padded vise or set it on a bench block so the trigger guard ears are accessible.
Step 2: Identify your mounting method. Most mil-spec lowers use a roll pin at the front and a set screw at the rear. Some billet and enhanced lowers use set screws at both points.
Step 3: Install the front. For a roll pin, start it by hand, then drive it with a roll pin punch until it’s flush. For a set screw, apply thread locker and tighten until snug.
Step 4: Install the rear. The rear detent and spring-loaded plunger must seat correctly before you drive the pin or screw. If it binds, back off and reseat.
Step 5: Function check. Confirm the guard is flush against the receiver ears with no gap, and that the trigger moves freely.
Expected Result: A gap-free fit with no rattle and full trigger access.
Securing the trigger guard requires steady hands and the right tools, much like the precision needed when selecting reliable tactical gear brands for your broader kit.
The most common install mistake is driving a roll pin before the rear detent and spring are seated. Force it and you’ll bend the pin or crack the receiver ear, which turns a 10-minute job into a stripped-lower replacement.
Compatibility and Fitment: What to Check Before Buying
Compatibility is where most trigger guard purchases go wrong, and it has nothing to do with brand loyalty. Lower receivers vary in the spacing and thickness of their receiver ears, and a guard machined for one spec can leave a visible gap or refuse to seat on another. The single biggest fitment failure is assuming all AR-15 lowers share the same receiver ear geometry.
Check these before you buy:
- Receiver ear spacing: mil-spec forged and billet dimensions differ, and billet lowers vary between manufacturers
- Mounting hardware type: roll pin vs. set screw, and whether your lower supports both
- Detent and spring clearance: some enhanced guards need a specific plunger length
- Finish match: anodized guards vary in shade between manufacturers
- Trigger reach impact: a wider guard can change how your finger contacts the trigger
A compatibility matrix is the fastest way to narrow the field. The table below maps common lower receiver types to the guard style that typically fits and the failure point to watch for. Treat it as a starting filter, not a guarantee, always confirm against the specific lower you own.
| Lower Receiver Type | Typical Mounting | Guard Style That Fits | Common Failure Point |
|---|---|---|---|
| Mil-spec forged (standard) | Roll pin front, set screw rear | Standard replacement or mild oversized | Rear detent not seated before pinning |
| Billet, tight-tolerance | Set screw both points | Precision-machined aluminum, set screw only | Ear thickness variance leaves a gap |
| Enhanced / ambi lower | Varies by maker | Maker-specific or set screw both points | Guard blocks ambi controls or bolt catch |
| Clone / variant lower | Varies | Guard tested against the specific variant | Detent length differences; roll pin hole misalignment |
| Polymer lower | Roll pin or set screw | Lightweight polymer or aluminum | Over-torquing set screws cracks the ear |
Two patterns show up again and again. First, tight-tolerance billet lowers reject guards built to loose mil-spec dimensions, the guard seats on one ear and floats on the other. Second, clone and variant lowers are the most common source of roll pin hole misalignment, which is why set screw guards are often the safer choice on those receivers.
Measure your lower’s receiver ear spacing and confirm the mounting hardware type before you order. If you’re running a clone build or an aftermarket lower, buy from a source that publishes variant compatibility testing rather than assuming “AR-15 compatible” means universal.
ATF guidance on firearm parts and assembly
DIY Modification vs. Aftermarket Alternatives
DIY modification of a standard trigger guard is possible but rarely worth it. Enlarging a mil-spec guard means removing material, which weakens the part and often voids any warranty on the lower. Aftermarket alternatives exist precisely because a properly machined oversized or curved guard does the job better and reversibly.
When DIY makes sense:
- You already own the tools and enjoy the project
- You’re working on a beater build where cosmetics don’t matter
- You only need a marginal increase in clearance
When aftermarket wins:
- You need a guaranteed fit on a specific lower
- You want a finished, anodized appearance
- You’re building for reliability, not experimentation
For clone builders on a budget, drop-in kits can offer a middle path: tested compatibility with various clones, hardened stainless internals, and anodized aluminum housings that hold up better than a hand-modified mil-spec part. It’s the difference between a part that was engineered for the job and one you hope holds together.
ATF guidance on firearm parts and assembly
Conclusion
Choosing among alternatives to standard AR-15 trigger guards comes down to matching the part to your glove size, your receiver, and how hard you run the gun. Get the fitment right and the rest follows.
Polymer Pew builds components for shooters who want tested compatibility without paying premium prices. Our aluminum MKE lower receivers are tested for variant compatibility, our full metal kits use anodized aluminum housings with stainless steel internals, and our super safety kits and flat triggers give you dependable performance upgrades. Get started with Polymer Pew and build a lower you can trust.
Frequently Asked Questions
What is the best AR-15 trigger guard for gloved use?
For gloved use, look for oversized or enhanced trigger guards with a V-shaped or curved profile that increases finger clearance. The Magpul Enhanced AR Trigger Guard and Strike Industries Cobra Trigger Guard are popular options. Polymer guards like the Magpul offer a budget-friendly entry point, while aluminum options like the FCD TGF provide a more rigid feel. The key is choosing a design with enough internal space to accommodate winter gloves without binding.
How do you install a roll pin trigger guard without damaging the lower?
To install a roll pin trigger guard without damaging the lower, support the receiver ears with a roll pin punch or a block of wood, then tap the pin in slowly with a hammer and punch. Use a roll pin starter punch to hold the pin straight. If the pin binds, stop and check alignment. Never force it, as this can crack the receiver ears. Some alternatives use set screws instead, which avoids roll pin installation entirely.
Are there benefits to using an oversized trigger guard?
Yes, oversized trigger guards offer several benefits. They provide extra room for gloved fingers, which is critical for winter shooting or tactical use. They can also improve ergonomics for shooters with larger hands or those wearing gloves. Some designs, like the Strike Industries Fang, add functional features such as a magazine guide. However, oversized guards may not fit all lower receivers, so check compatibility before buying.
What is the difference between a fixed and removable trigger guard?
A fixed trigger guard is integrated into the lower receiver and cannot be removed, while a removable trigger guard is a separate piece attached with roll pins or set screws. Most AR-15 lower receivers use a removable guard, allowing for customization. Alternatives to standard guards are often removable, giving you the option to swap between polymer and aluminum based on your needs. Fixed guards are typically found on some polymer lowers.

