


Table of Contents
- What Causes Super Safety Selector Binding
- Super Safety Installation Guide: Step-by-Step
- Best Lubricants for Super Safety and Friction Reduction
- Super Safety Dead Trigger Troubleshooting
- Preventing Super Safety Binding: Precision Adjustments
- Common Mistakes to Avoid During Installation
- Conclusion
Last Updated: August 7, 2026
What Causes Super Safety Selector Binding
Super safety selector binding occurs when the safety lever gets stuck or moves with excessive resistance during installation or operation. This happens because the component doesn’t fit smoothly into the receiver, creating mechanical friction that prevents normal cycling. The issue typically stems from tolerance stacking between components and mechanical interference where parts shouldn’t contact each other.
Tolerance Stacking and Receiver Fitment
Tolerance stacking happens when multiple parts are manufactured within acceptable tolerances individually, but when combined, their tolerances add up and create a fit that’s too tight. A super safety selector that’s perfectly within spec can still bind if your lower receiver is at the upper end of its tolerance range.
Different receiver manufacturers produce parts with varying dimensions. When you pair a selector designed for standard tolerances with a receiver that’s slightly oversized or undersized, binding becomes inevitable. Many builders don’t check receiver fitment before installation, assuming that if the part is in spec, it will fit. In practice, you need to verify that your specific lower receiver matches your specific selector. Polymer Pew’s super safety kits are tested for compatibility across common receiver variants.
Mechanical Interference and Clearance Issues
Mechanical interference occurs when the safety selector contacts surfaces it shouldn’t during its travel range. The selector lever needs clearance as it rotates from safe to fire and back. If the hammer position is too high, if the buffer tube is positioned incorrectly, or if the takedown pin alignment is off, the selector can bind against these components.
The most common interference point is between the selector lever and the trigger hammer. When the hammer sits too far forward or too high, it reduces the available space for the selector to move. Buffer tube positioning also affects clearance, if installed too far forward into the receiver, it can interfere with the selector’s rotation path. These clearance issues compound when combined with tolerance stacking.
Super Safety Installation Guide: Step-by-Step
Installing a super safety selector correctly requires methodical preparation and careful attention to alignment. Most binding problems originate from skipped inspection steps or assumptions about component compatibility.
What You’ll Need Before Starting
Gather these items before you begin:
- Your lower receiver and upper receiver assembly
- The super safety selector kit (selector lever, spring, detent pin, and hardware)
- Precision calipers or ruler for measurements
- Small flashlight for inspecting inside the receiver
- Workbench with good lighting
- Cleaning supplies (compressed air, cloth)
- Function test jig or assembled upper receiver for testing
Good lighting is non-negotiable, binding issues are often caused by misalignment you simply can’t see in dim conditions.
Pre-Installation Inspection and Alignment Check
Before touching the selector, inspect your receiver’s selector hole for debris, burrs, or manufacturing defects. Use compressed air to clear any dust, then visually check that the hole is clean and uniform. Run your finger carefully around the hole’s edges to feel for any raised edges or irregularities.
Measure the selector hole diameter with calipers if you have them and compare to your selector’s specifications. Check the hammer position by looking down into the receiver with your flashlight, the hammer should sit at a height that leaves clear space above it for the selector lever to rotate. Inspect the buffer tube installation depth and verify that takedown pin holes are properly aligned.
This inspection phase takes ten minutes but prevents hours of troubleshooting.
Installing the Safety Selector and Testing Function
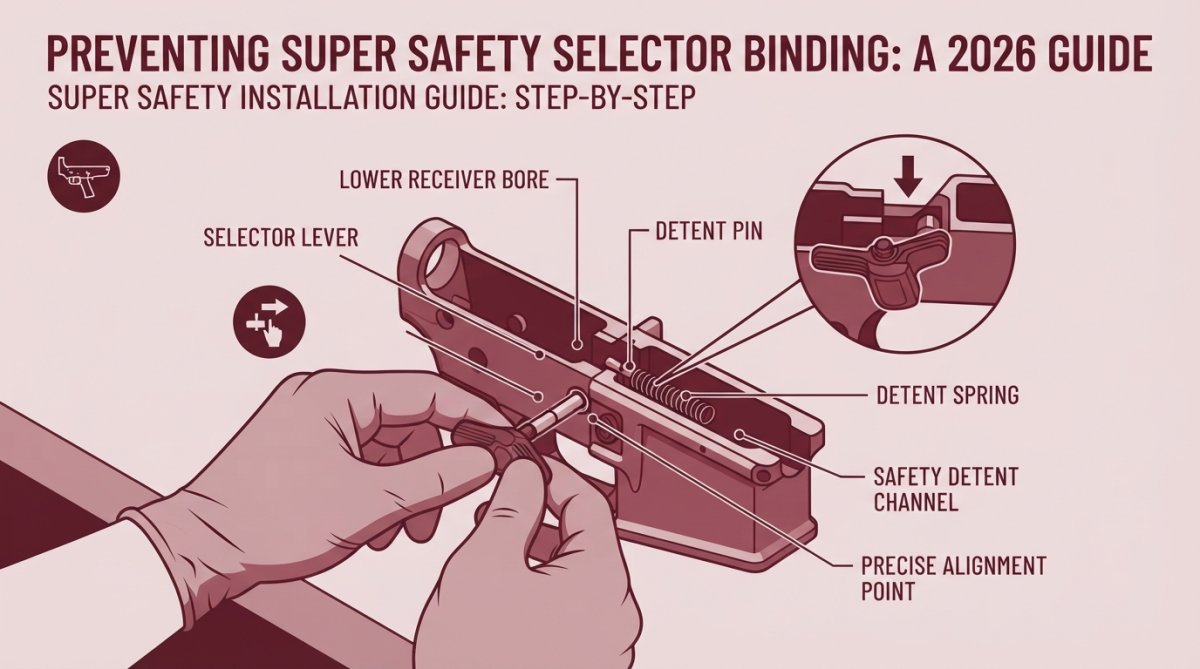
Start by inserting the detent pin spring into the receiver, positioning it where it will support the detent pin. Carefully insert the selector lever into the receiver, aligning it with the hole. Move it slowly through its full range of motion, from safe to fire, while watching for any resistance or catching. The lever should move smoothly with consistent resistance from the spring.
Once the selector is fully inserted, install the detent pin. Test the selector’s function repeatedly by cycling it through its full range at least twenty times, feeling for any binding or unusual resistance. Each movement should feel identical, no grinding, no sticking points, no sudden resistance.
Reassemble your upper receiver onto the lower and perform a function test with the charging handle. The selector should move smoothly and the hammer should reset properly when you cycle the action.
Best Lubricants for Super Safety and Friction Reduction
Lubrication is the most overlooked factor in preventing super safety selector binding. The right lubricant reduces friction between moving parts, masks minor tolerance issues, and keeps the selector functioning smoothly even as components wear over time.
Why Lubrication Matters for Smooth Operation
Lubrication reduces the coefficient of friction between the selector lever and the receiver surfaces it contacts during rotation. This means the selector moves with less resistance, and minor interference issues that would cause binding in a dry assembly become barely noticeable in a properly lubricated one.
The lubrication also fills microscopic gaps where tolerance stacking might otherwise create binding. A thin film of lubricant between the selector and receiver allows movement that would otherwise be impossible. Additionally, lubrication protects against wear patterns that develop over time, slowing the accumulation of friction that can eventually cause binding.
Recommended Products and Application Techniques
Use a light machine oil or firearms-specific lubricant for the selector assembly. Heavy grease or thick lubricants trap dirt and debris, creating more problems than they solve. Apply lubricant sparingly, a single small drop on the spring, a thin film on the selector lever’s contact surfaces, and a tiny amount on the detent pin is sufficient.
For the selector hole in the receiver, apply lubricant by running a lightly oiled cloth around the inside of the hole. After applying lubricant, cycle the selector through its full range at least ten times to distribute it evenly across all contact surfaces. Reapply lubricant every few hundred rounds or every few months if you don’t shoot frequently.
Apply lubricant to the selector assembly after every major cleaning. If you detail-strip your lower receiver, add fresh lubricant before reassembling. This simple habit prevents most binding issues before they start.
Super Safety Dead Trigger Troubleshooting
A dead trigger, where the selector moves but the hammer doesn’t reset or the trigger won’t function, indicates binding in the selector assembly or mechanical interference elsewhere in the trigger group.
Diagnosing Binding vs. Spring Tension Problems
Start by removing your upper receiver and manually cycling the selector while watching the hammer. The hammer should move with each selector position change. If the hammer doesn’t move at all, the selector is bound so tightly that it’s not engaging the hammer’s sear surfaces.
If the hammer moves but feels sticky, you’re dealing with friction rather than complete binding. Test the trigger independently by pressing it while the selector is in the fire position. If the trigger feels stuck or doesn’t reset, the problem isn’t in the selector, it’s in the trigger assembly itself.
Visual Inspection Guide and Component Check
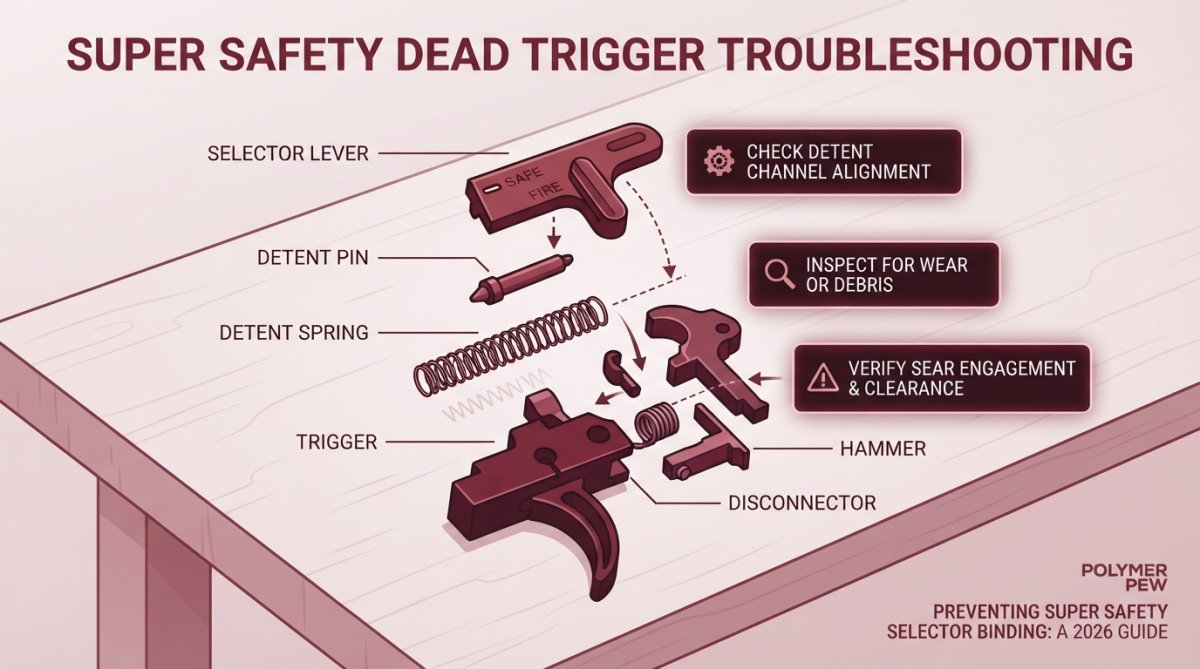
Remove the selector assembly completely and lay out all components on a clean workbench. Inspect each piece individually under bright light for visible damage, deformation, or wear patterns.
Check the selector lever for cracks, bent edges, or deformed contact surfaces. Inspect the detent pin for straightness and the spring for deformation or loss of tension. Examine the receiver’s selector hole for burrs, cracks, or deformation. Inspect the hammer surface where the selector engages it for wear patterns that indicate misalignment.
Preventing Super Safety Binding: Precision Adjustments
Once you’ve diagnosed the source of binding, precision adjustments can often resolve the issue without replacing components. The goal is to create sufficient clearance for the selector to move freely while maintaining proper mechanical engagement with the hammer and trigger group.
Hammer Position and Detent Pin Compatibility
The hammer’s position relative to the selector is critical. If the hammer sits too far forward, the selector lever can’t rotate fully. Check hammer position by looking into the receiver with your flashlight. The hammer should sit in a neutral position with clear space above it for the selector to move.
Hammer position is determined by the trigger group installation and spring tension. Verify that your trigger group is fully seated and that the hammer spring is properly compressed. Detent pin compatibility also affects how the selector engages with the receiver and hammer. Verify your detent pin diameter matches your receiver and selector specifications. An oversized pin sits too high and interferes with selector movement; an undersized pin allows too much play.
Buffer Tube and Takedown Pin Alignment
Buffer tube position directly affects selector clearance. If the buffer tube extends too far into the receiver, it reduces the available space for the selector to move. Check buffer tube depth by measuring from the receiver face to the buffer tube end and compare to the manufacturer’s specification. If installed too far forward, remove it and reinstall to the correct depth.
Takedown pin alignment affects both selector movement and overall receiver function. Check pin alignment by inserting the pins and verifying they move freely without catching. If a takedown pin binds, inspect the pin holes carefully for cracks, burrs, or deformation.
Testing for Binding and Function Checks
After making any adjustments, perform systematic function tests before live fire. Move the selector through its full range at least twenty times, feeling for resistance at each position. The selector should move smoothly with consistent resistance from the spring, no grinding sensation, no sudden resistance, no catching or sticking.
Manually cycle the charging handle while moving the selector through its positions. The hammer should reset audibly with each cycle. Finally, perform a dry fire function test with the upper receiver assembled. Everything should function smoothly and consistently.
Do not attempt to file or grind receiver components unless you have experience with precision metalwork. Removing too much material can create safety issues and permanent damage. When in doubt, replace the component rather than modify it.
Common Mistakes to Avoid During Installation
Most super safety selector binding problems trace back to specific installation mistakes that are easy to prevent with awareness.
The first mistake is skipping the pre-installation inspection. Always inspect receiver fitment and component clearance before installation. The second mistake is rushing through installation, taking time to verify alignment at each step catches problems immediately. The third mistake is using incorrect lubricants or applying lubricant incorrectly. Use light machine oil applied sparingly and distributed evenly.
The fourth mistake is not testing function after installation. Test function immediately after installation so you can troubleshoot while the assembly is fresh. The fifth mistake is assuming binding means the part is defective, most binding issues stem from tolerance stacking or mechanical interference, not defective components. The sixth mistake is modifying components without understanding the consequences. Understand why binding is occurring before attempting modifications.
Super safety selector binding is frustrating, but it’s almost entirely preventable with proper inspection, careful installation, and systematic troubleshooting. At Polymer Pew, we’ve engineered our super safety kits for compatibility across common receiver variants. When you’re ready to upgrade your platform with components designed for reliable function, explore our precision-engineered super safety kits and discover why builders choose components that work the first time.
| Issue | Diagnostic Step | Fix | Prevention |
|---|---|---|---|
| Selector moves with resistance | Manual cycling test | Apply light lubricant, verify clearance | Pre-installation inspection |
| Hammer doesn’t reset | Observe hammer movement while cycling selector | Check hammer position, verify spring tension | Test after each assembly step |
| Selector completely stuck | Try manual pressure on hammer while cycling | Remove selector, inspect for damage or debris | Clean receiver before installation |
| Binding at specific selector position | Cycle slowly and identify exact position | Check mechanical interference at that position | Verify buffer tube and takedown pin alignment |
| Loose selector with excessive play | Feel for movement in assembled selector | Verify detent pin diameter matches specs | Use correct detent pin size |
Frequently Asked Questions
Why does my Super Safety selector bind during operation?
Super Safety selector binding usually stems from tolerance stacking between the receiver, safety housing, and trigger hammer, or mechanical interference where the selector lever contacts the buffer tube or charging handle during travel. Binding can also result from improper installation angle, insufficient clearance at the cam surface, or a safety selector installed in an upper or lower receiver with tighter tolerances than intended. A visual inspection of the selector lever's full range of motion and careful measurement of clearance gaps will identify where contact occurs.
What causes a dead trigger in a Super Safety setup?
A dead trigger, where the trigger fails to reset or respond to input, typically happens when the detent pin is incompatible with your bolt carrier group or hammer, when spring tension is compromised, or when the safety selector's cam surface interferes with hammer movement. Over-tight installation can also cause the trigger housing to bind the trigger itself. Start by confirming detent pin and bolt carrier group compatibility, checking spring condition, and ensuring the safety selector rotates freely without contacting internal components.
What are the best lubricants for Super Safety components?
Friction-reducing lubricants designed for firearms work best: light machine oil, gun oil with PTFE (polytetrafluoroethylene), or specialized trigger lubricants applied sparingly to the cam surface, detent pin, and selector lever pivot point. Avoid heavy grease, which can accumulate debris and worsen binding. Apply lubricant in thin layers and cycle the selector 20-30 times to distribute it evenly. Re-lubricate every 500-1000 rounds or whenever you notice increased friction during operation.
How do I know if my Super Safety is binding due to tolerance stacking?
Tolerance stacking occurs when small manufacturing variations in the receiver, safety housing, and internal components accumulate, restricting selector movement. Test by manually cycling the selector through its full range without the bolt carrier group installed, if it binds, the problem is in the safety assembly itself. If it moves freely without the BCG but binds with the BCG installed, the issue is likely hammer position or detent pin compatibility. Measure clearance gaps between the selector lever and receiver walls with calipers; gaps under 0.015 inches indicate potential stacking.
This article was written using GrandRanker

